Install &Configure OpenVPN on RHEL/Centos

A passionate DevOps & High Performance Computing enthusiast from India
A VPN also known as a “Virtual Private Network” is a technology that allows you to create a secure private network over the public internet. This will help you to encrypt your internet traffic and protect your online identity. It is primarily used to connect two business networks securely over the internet and allows you to connect a business network from home.
Requirements:
Virtual machines: Three
Centos 7.9: Two
Windows Server 2016: On
Now here we are making a Windows server machine as a server for our local website (webpage) and Linux machines will work as OpenVPN servers and client
Openvpn-server
Network adapters: NAT, HOST-ONLY
In the image below you can see the machine configurations;
And check in the terminal if you're getting IPs for both NAT and Host-only modes

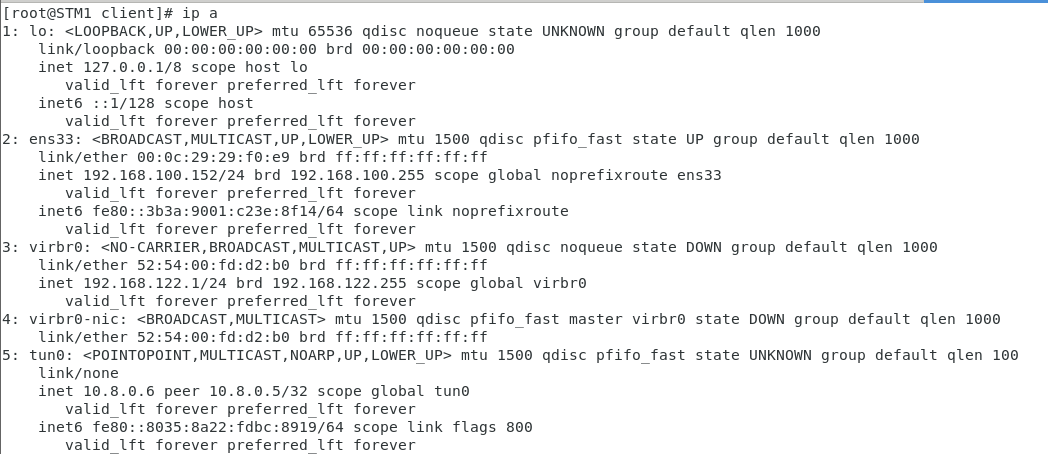
OpenVPN-client
Network adapters: NAT
In the image below you can see the machine configurations;

And check in the terminal if you're getting IP for NAT mode

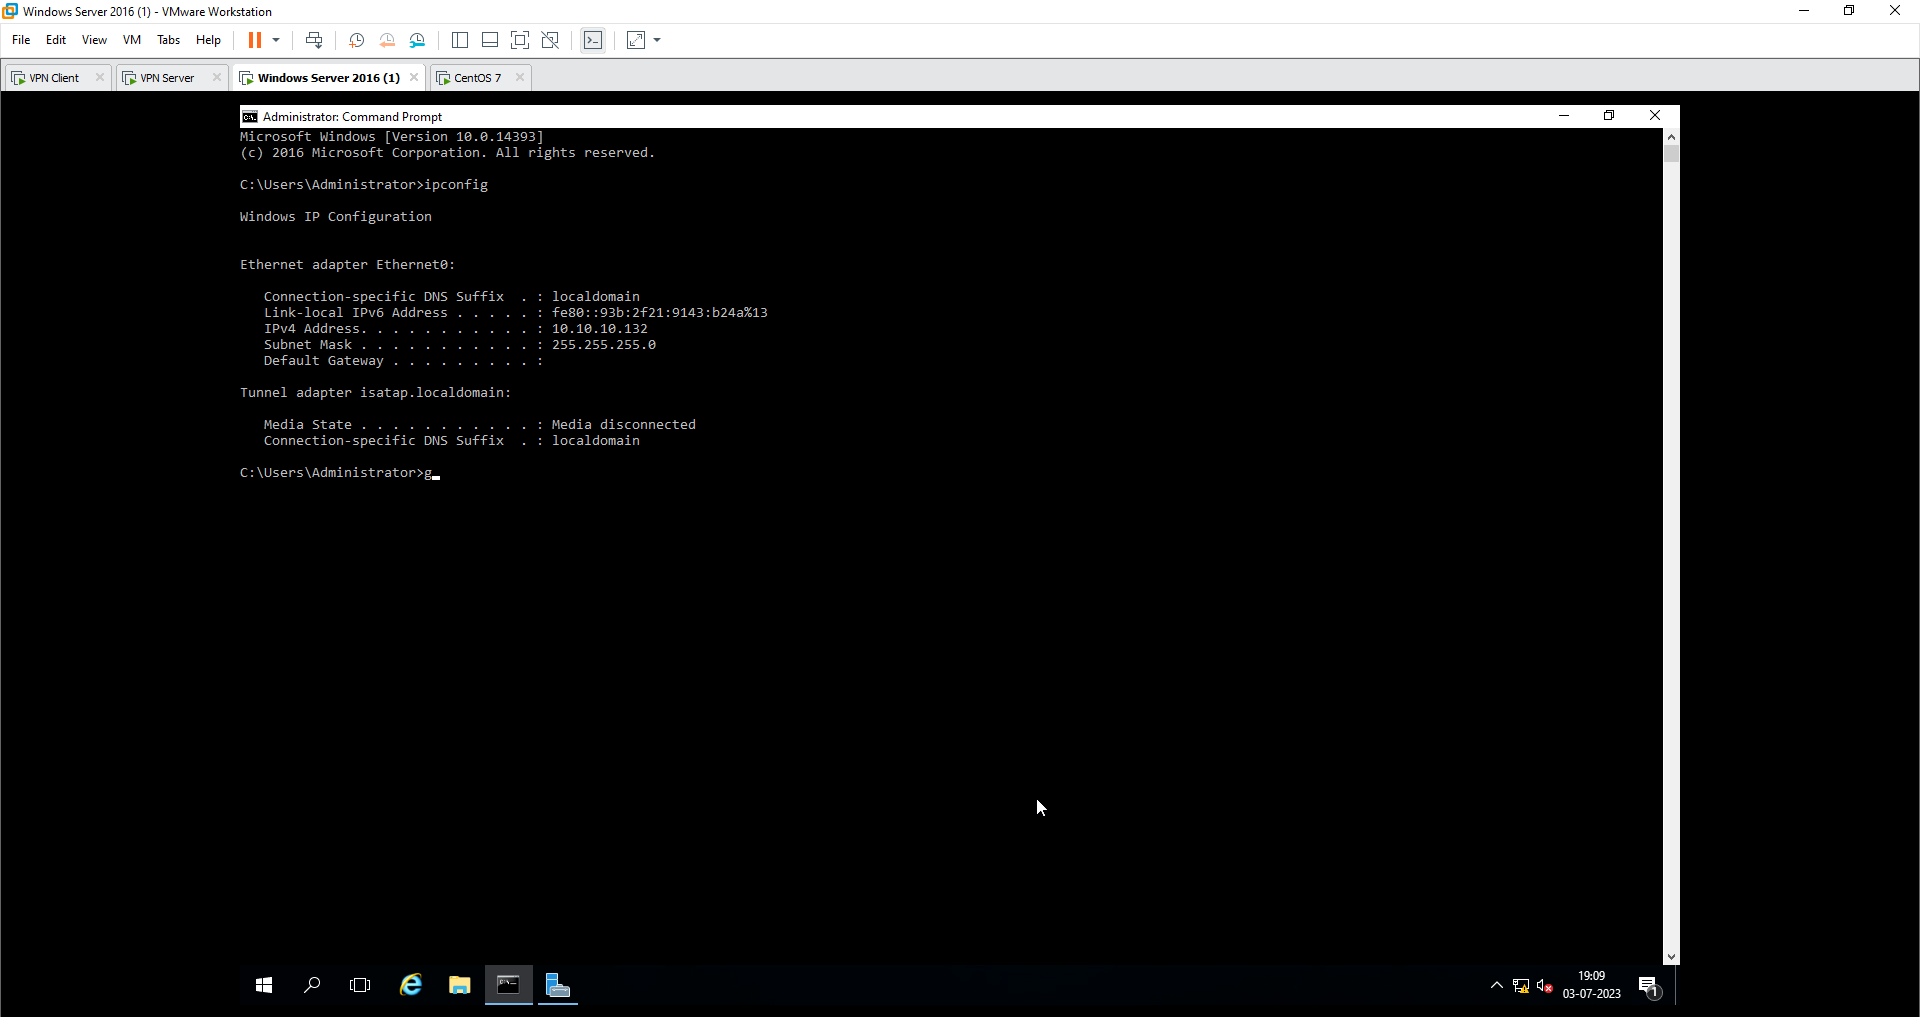
Windows machine
Network adapters: HOST-ONLY

And check in cmd if you're getting IP for Host-only mode
Now to install OpenVPN
Run the following commands on the OpenVPN-Server machine
Step 1 – Disable SELinux
vim /etc/selinux/config SELINUX=disabled
Step 2 – Enable IP Forwarding
vim /etc/sysctl.conf net.ipv4.ip_forward = 1
Step 3 – Install OpenVPN Server
yum install epel-release -y yum install openvpn -y
Once the installation has been completed, you will also need to download easy-rsa for managing SSL certificates.
Run the following command to download easy-rsa inside /etc/openvpn directory.
cd /etc/openvpn

wget https://github.com/OpenVPN/easy-rsa/releases/download/v3.0.6/EasyRSA-unix-v3.0.6.tgz

tar -xvzf EasyRSA-unix-v3.0.6.tgz

mv EasyRSA-v3.0.6 easy-rsa
Step 4 – Setup Certificate Authority
Easy RSA uses a set of scripts to generate keys and certificates. First, you will need to configure the Certificate Authority on your system.
To do so, change the directory to /etc/openvpn/easy-rsa and create a new Easy RSA configuration file:
cd /etc/openvpn/easy-rsa vim vars
cd /etc/openvpn/easy-rsa
vim vars

      set_var EASYRSA                 "$PWD"
      set_var EASYRSA_PKI             "$EASYRSA/pki"
      set_var EASYRSA_DN              "cn_only"
      set_var EASYRSA_REQ_COUNTRY     "INDIA"
      set_var EASYRSA_REQ_PROVINCE    "Maharashtra"
      set_var EASYRSA_REQ_CITY        "Pune"
      set_var EASYRSA_REQ_ORG         "ACTS CDAC"
      set_var EASYRSA_REQ_EMAIL       "admin@acts.net"
      set_var EASYRSA_REQ_OU          "ACTS"
      set_var EASYRSA_KEY_SIZE        2048
      set_var EASYRSA_ALGO            rsa
      set_var EASYRSA_CA_EXPIRE       7500
      set_var EASYRSA_CERT_EXPIRE     365
      set_var EASYRSA_NS_SUPPORT      "no"
      set_var EASYRSA_NS_COMMENT      "ACTS CDAC"
      set_var EASYRSA_EXT_DIR         "$EASYRSA/x509-types"
      set_var EASYRSA_SSL_CONF        "$EASYRSA/openssl-easyrsa.cnf"
      set_var EASYRSA_DIGEST          "sha256"
Save the file when you are finished.
Next, run the following command to initiate the PKI directory.
./easyrsa init-pki
Output:
Note: using Easy-RSA configuration from ./vars
init-pki complete; you may now create a CA or requests.
Your newly created PKI dir is: /etc/openvpn/easy-rsa/pki
Next, build the CA certificates with the following command:
./easyrsa build-ca
Note: using Easy-RSA configuration from: ./vars
Using SSL: openssl OpenSSL 1.0.2k-fips  26 Jan 2017

      Enter New CA Key Passphrase:   *password*
      Re-Enter New CA Key Passphrase:   *password*
      Generating RSA private key, 2048 bit long modulus
      .......................................................................................................................................................+++
      ...............................................................+++
      e is 65537 (0x10001)
      You are about to be asked to enter information that will be incorporated
      into your certificate request.
      What you are about to enter is what is called a Distinguished Name or a DN.
      There are quite a few fields but you can leave some blank
      For some fields there will be a default value,
      If you enter '.', the field will be left blank.
      -----
      Common Name (eg: your user, host, or server name) [Easy-RSA CA]:openvpn-server

      CA creation complete and you may now import and sign cert requests.
      Your new CA certificate file for publishing is at:
      /etc/openvpn/easy-rsa/pki/ca.crt
The above command will generate two files named ca.key and ca.crt. These certificates will be used to sign your server and clients’ certificates.
Step 5 – Generate Server Certificate Files
Next, you will need to generate a key pair and certificate request for your server.
Run the following command to generate the server key named vpn-server :
./easyrsa gen-req vpn-server (name you want to give) nopass
Note: using Easy-RSA configuration from: ./vars
Using SSL: openssl OpenSSL 1.0.2k-fips  26 Jan 2017
      Generating a 2048 bit RSA private key
      .................................................+++
      ..............+++
      writing new private key to '/etc/openvpn/easy-rsa/pki/private/vpn-server.key.CU50DeADGG'
      -----
      You are about to be asked to enter information that will be incorporated
      into your certificate request.
      What you are about to enter is what is called a Distinguished Name or a DN.
      There are quite a few fields but you can leave some blank
      For some fields there will be a default value,
      If you enter '.', the field will be left blank.
      -----
      Common Name (eg: your user, host, or server name) [vpn-server]:

      Keypair and certificate request completed. Your files are:
      req: /etc/openvpn/easy-rsa/pki/reqs/vpn-server.req
      key: /etc/openvpn/easy-rsa/pki/private/vpn-server.key
Step 6 – Sign the Server Key Using CA
Next, you will need to sign the vpn-server key using your CA certificate:
Run the following command to sign the server key:
./easyrsa sign-req server vpn-server (your given name)
Note: using Easy-RSA configuration from: ./vars
Using SSL: openssl OpenSSL 1.0.2k-fips  26 Jan 2017


    You are about to sign the following certificate.
    Please check over the details shown below for accuracy. Note that this request
    has not been cryptographically verified. Please be sure it came from a trusted
    source or that you have verified the request checksum with the sender.

    Request subject, to be signed as a server certificate for 365 days:

    subject=
        commonName                = vpn-server


    Type the word 'yes' to continue, or any other input to abort.
      Confirm request details: yes
    Using configuration from /etc/openvpn/easy-rsa/pki/safessl-easyrsa.cnf
    Enter pass phrase for /etc/openvpn/easy-rsa/pki/private/ca.key:
    Check that the request matches the signature
    Signature ok
    The Subject's Distinguished Name is as follows
    commonName            :ASN.1 12:'vpn-server'
    Certificate is to be certified until Jul  2 05:27:17 2024 GMT (365 days)

    Write out database with 1 new entries
    Data Base Updated

    Certificate created at: /etc/openvpn/easy-rsa/pki/issued/vpn-server.crt
Next, verify the generated certificate file with the following command:
openssl verify -CAfile pki/ca.crt pki/issued/vpn-server.crt
If everything is fine, you should get the following output:
pki/issued/vpn-server.crt: OK
Next, run the following command to generate a strong Diffie-Hellman key to use for the key exchange:
./easyrsa gen-dh
You should get the following output:
Note: using Easy-RSA configuration from: ./vars

Using SSL: openssl OpenSSL 1.0.2k-fips  26 Jan 2017
Generating DH parameters, 2048 bit long safe prime, generator 2
This is going to take a long time
..................................................................................................................................+............+.....................................................................+............................................................++*++*
DH parameters of size 2048 created at /etc/openvpn/easy-rsa/pki/dh.pem
After creating all certificate files, copy them to the /etc/openvpn/server/ directory:
      cp pki/ca.crt /etc/openvpn/server/
      cp pki/dh.pem /etc/openvpn/server/
      cp pki/private/vpn-server.key /etc/openvpn/server/
      cp pki/issued/vpn-server.crt /etc/openvpn/server/
Step 7 – Generate Client Certificate and Key File
Next, you will need to generate the key and certificate file for the client.
First, run the following command to build the client key file:
./easyrsa gen-req client (name as per need) nopass
Note: using Easy-RSA configuration from: ./vars
Using SSL: openssl OpenSSL 1.0.2k-fips  26 Jan 2017
    Generating a 2048 bit RSA private key
    ............................................................................+++
    .....................+++
    writing new private key to '/etc/openvpn/easy-rsa/pki/private/client.key.pCE5UiN9WM'
    -----
    You are about to be asked to enter information that will be incorporated
    into your certificate request.
    What you are about to enter is what is called a Distinguished Name or a DN.
    There are quite a few fields but you can leave some blank
    For some fields there will be a default value,
    If you enter '.', the field will be left blank.
    -----
    Common Name (eg: your user, host, or server name) [client]:vpn-client

    Keypair and certificate request completed. Your files are:
    req: /etc/openvpn/easy-rsa/pki/reqs/client.req
    key: /etc/openvpn/easy-rsa/pki/private/client.key
Next, sign the client key using your CA certificate:
./easyrsa sign-req client client
Note: using Easy-RSA configuration from: ./vars
Using SSL: openssl OpenSSL 1.0.2k-fips  26 Jan 2017


    You are about to sign the following certificate.
    Please check over the details shown below for accuracy. Note that this request
    has not been cryptographically verified. Please be sure it came from a trusted
    source or that you have verified the request checksum with the sender.

    Request subject, to be signed as a client certificate for 365 days:

    subject=
        commonName                = vpn-client


    Type the word 'yes' to continue, or any other input to abort.
      Confirm request details: yes
    Using configuration from /etc/openvpn/easy-rsa/pki/safessl-easyrsa.cnf
    Enter pass phrase for /etc/openvpn/easy-rsa/pki/private/ca.key:
    Check that the request matches the signature
    Signature ok
    The Subject's Distinguished Name is as follows
    commonName            :ASN.1 12:'vpn-client'
    Certificate is to be certified until Jul  2 06:32:54 2024 GMT (365 days)

    Write out database with 1 new entries
    Data Base Updated

    Certificate created at: /etc/openvpn/easy-rsa/pki/issued/client.crt
Next, copy all client certificates and key files to the /etc/openvpn/client/ directory:
      cp pki/ca.crt /etc/openvpn/client/
      cp pki/issued/client.crt /etc/openvpn/client/
      cp pki/private/client.key /etc/openvpn/client/
Next, create a new OpenVPN configuration file inside /etc/openvpn/client/ directory:
vim /etc/openvpn/server/server.conf
Make necessary changes in the files and replace names for the same
    port 1194
    proto udp
    dev tun
    ca /etc/openvpn/server/ca.crt
    cert /etc/openvpn/server/vpn-server.crt
    key /etc/openvpn/server/vpn-server.key
    dh /etc/openvpn/server/dh.pem
    server 10.8.0.0 255.255.255.0
    #push "redirect-gateway def1"
    #push "dhcp-option DNS 208.67.222.222"
    #push "dhcp-option DNS 208.67.220.220"
    duplicate-cn
    cipher AES-256-CBC
    tls-version-min 1.2
    tls-cipher TLS-DHE-RSA-WITH-AES-256-GCM-SHA384:TLS-DHE-RSA-WITH-AES-256-CBC-SHA256:TLS-DHE-RSA-WITH-AES-128-GCM-SHA256:TLS-DHE-RSA-WITH-AES-128-CBC-SHA256
    auth SHA512
    auth-nocache
    keepalive 20 60
    persist-key
    persist-tun
    compress lz4
    daemon
    user nobody
    group nobody
    log-append /var/log/openvpn.log
    verb 3
Step 9 – Start OpenVPN Service
OpenVPN is now installed and configured. You can now start the OpenVPN service and enable it to start after the system reboots using the following command:
systemctl start openvpn-server@server
systemctl enable openvpn-server@server
run the following command to verify the status of the OpenVPN service:
systemctl status openvpn-server@server
Step 10 – Configure Routing using Firewalld
First, you will need to allow the OpenVPN service through firewalls.
To do so, add the OpenVPN service and tun0 interface to the trusted firewall zone:
firewall-cmd --permanent --add-service=openvpn
firewall-cmd --permanent --zone=trusted --add-service=openvpn
firewall-cmd --permanent --zone=trusted --add-interface=tun0
Next, add the MASQUERADE on the default zone:
firewall-cmd --add-masquerade
firewall-cmd --permanent --add-masquerade
Next, run the following command to masquerade the internet traffic coming from the VPN network (10.8.0.0/24) to the system's local network interface (eth0).
firewall-cmd --permanent --direct --passthrough ipv4 -t nat -A POSTROUTING -s 10.8.0.0/24 -o ens33(name of NAT interface) -j MASQUERADE
Finally, run the following command to implement the changes:
firewall-cmd --reload
Step 11 – Generate Client Configuration File
Next, create a new OpenVPN client configuration file named client.ovpn. You will require this file to connect your OpenVPN server from the client system.
vim /etc/openvpn/client/client.ovpn
client
dev tun
proto udp
remote 192.168.100.153(IP of openvpn server) 1194
ca ca.crt
cert client.crt
key client.key
cipher AES-256-CBC
auth SHA512
auth-nocache
tls-version-min 1.2
tls-cipher TLS-DHE-RSA-WITH-AES-256-GCM-SHA384:TLS-DHE-RSA-WITH-AES-256-CBC-SHA256:TLS-DHE-RSA-WITH-AES-128-GCM-SHA256:TLS-DHE-RSA-WITH-AES-128-CBC-SHA256
resolv-retry infinite
compress lz4
nobind
persist-key
persist-tun
mute-replay-warnings
verb 3
Now copy the client config file to OpenVPN-client
scp -r root@192.168.100.152:/etc/openvpn/client .
On client
Make changes in the client network
Keep the client machine on NAT mode only give Manual IP and make sure there are no DNS and no Gateway
On the client terminal run the below command to start tunneling
openvpn --config client.ovpn
then check for ip we will get tun0
Again on SERVER
we need to add a route so that we can access the webpage which we've created on the Windows server
Run the below command and make changes in the server.conf file
cd /etc/openvpn/server vim server.conf
The file will look something like this;
      port 1194
      proto udp
      dev tun
      ca /etc/openvpn/server/ca.crt
      cert /etc/openvpn/server/vpn-server.crt
      key /etc/openvpn/server/vpn-server.key
      dh /etc/openvpn/server/dh.pem
      server 10.8.0.0 255.255.255.0

      #put windows ip (server for website) and end it with 0
      push "route 10.10.10.0 255.255.255.0"

      #push "redirect-gateway def1"
      #push "dhcp-option DNS 208.67.222.222"
      #push "dhcp-option DNS 208.67.220.220"
      duplicate-cn
      cipher AES-256-CBC
      tls-version-min 1.2
      tls-cipher TLS-DHE-RSA-WITH-AES-256-GCM-SHA384:TLS-DHE-RSA-WITH-AES-256-CBC-SHA256:TLS-DHE-RSA-WITH-AES-128-GCM-SHA256:TLS-DHE-RSA-WITH-AES-128-CBC-SHA256
      auth SHA512
      auth-nocache
      keepalive 20 60
      persist-key
      persist-tun
      compress lz4
      daemon
      user nobody
      group nobody
      log-append /var/log/openvpn.log
      verb 3
Then restart the openvpn-server
systemctl restart openvpn-server@server
systemctl start openvpn-server@server
now we can access the Windows website from the client browser.


