Install Sonarqube server on AWS Ubuntu instance using docker-compose

A passionate DevOps & High Performance Computing enthusiast from India
In this brief article, we will explore how to install and configure the Sonarqube server along with the PostgreSQL database in an Ubuntu instance running in AWS using docker-compose. Let’s get started!!
Step-1: Create an AWS Ubuntu instance
Login to your AWS management console, navigate to the EC2 dashboard page and click on the Launch instances button, which will open up the setup wizard for configuring the instance.


I will create a new Ubuntu-based instance using the below details.
Name: sonar-server
OS image: Ubuntu 22.04 (LTS)
Instance Type: t2.medium
As mentioned in the Pre-requisites section for Sonarqube, we need to ensure that we have at least 2 GB of memory for the instance if we are running a small-scale instance of the server. Since we are just exploring it for demo purposes, I will go ahead and select the instance type as t2.medium.
Next, I will create a new key pair (.pem) file and configure the security group rule opening up ports: 22 (SSH) and 9000 (Sonar server) for inbound communication to our instance.
Finally, I will specify the storage as default: 8GiB and will click on the button Launch instance to complete the setup process.

Step 2: Connect to the instance, and install docker-compose
Connect to our Ubuntu instance using the command prompt, for this, I will just use the command mentioned below.
The .pem file is “sonar-key.pem” and my instance public-ip is 13.126.57.51
ssh -i sonar-key.pem ubuntu@13.126.57.51
Post connecting to the instance, I will just run the update command
sudo apt update -y
Next, we will go ahead and install docker and docker-compose, for this run the below set of commands one by one.
sudo apt-get install \
    ca-certificates \
    curl \
    gnupg \
    lsb-release
sudo mkdir -m 0755 -p /etc/apt/keyrings
curl -fsSL https://download.docker.com/linux/ubuntu/gpg | sudo gpg --dearmor -o /etc/apt/keyrings/docker.gpg
echo \
  "deb [arch=$(dpkg --print-architecture) signed-by=/etc/apt/keyrings/docker.gpg] https://download.docker.com/linux/ubuntu \
  $(lsb_release -cs) stable" | sudo tee /etc/apt/sources.list.d/docker.list > /dev/null
Post running the above commands, we will run the update command again.
sudo apt update -y
Finally, to install docker, docker-compose using the below command
sudo apt-get install docker-ce docker-ce-cli docker-compose -y
It might take a few minutes to install all the relevant dependencies and packages, post which we can just the run below command to verify if docker and docker-compose have been installed properly.
sudo docker --version
sudo docker-compose --version
We can verify if the docker service is running properly using the command
sudo service docker status
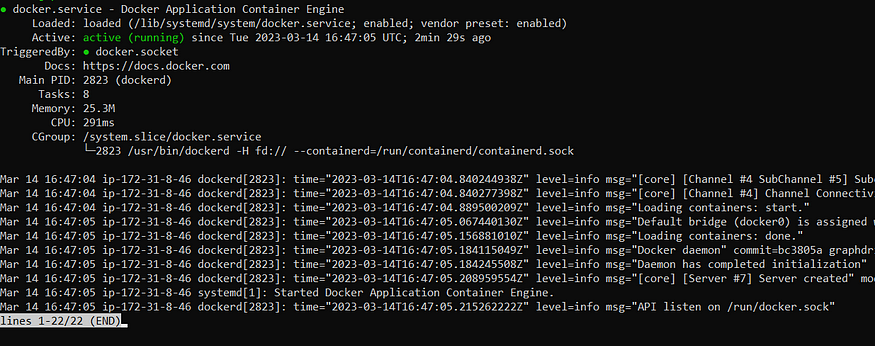
In case the daemon is not running, you can just start the service using the command mentioned below.
sudo service docker start
Additionally, for Linux-based instances, we need to configure the below details as well.
Run the below command to open the config file.
sudo vi /etc/sysctl.conf
in the Config file, press the “I” key to insert content and add the below lines at the end of the file and save the changes.
vm.max_map_count=262144
fs.file-max=65536
Run the below command to make sure changes are updated.
sudo sysctl -p
Step-3: Add Ubuntu user to the docker user group
Next, we will add the Ubuntu user to a docker group so that we can run our docker commands without using the “sudo” prefix.
Create the docker group
sudo groupadd docker
Add the user: “ubuntu” to the docker group which we just created.
sudo usermod -aG docker ubuntu
Finally, we will just disconnect and reconnect to our instance again from the command prompt terminal to enable the changes. We can verify so by just running the below commands without the sudo prefix.
docker images
docker ps

Step-4: Create a docker-compose file and start the Sonar server
In order to quickly configure and manage the SonarQube server we will be using the docker-compose file which will set up a sonar instance along with the postgres database.
version: "3"

services:
  sonarqube:
    image: sonarqube:community
    depends_on:
      - db
    environment:
      SONAR_JDBC_URL: jdbc:postgresql://db:5432/sonar
      SONAR_JDBC_USERNAME: sonar
      SONAR_JDBC_PASSWORD: sonar
    volumes:
      - sonarqube_data:/opt/sonarqube/data
      - sonarqube_extensions:/opt/sonarqube/extensions
      - sonarqube_logs:/opt/sonarqube/logs
    ports:
      - "9000:9000"
  db:
    image: postgres:12
    environment:
      POSTGRES_USER: sonar
      POSTGRES_PASSWORD: sonar
    volumes:
      - postgresql:/var/lib/postgresql
      - postgresql_data:/var/lib/postgresql/data

volumes:
  sonarqube_data:
  sonarqube_extensions:
  sonarqube_logs:
  postgresql:
  postgresql_data:
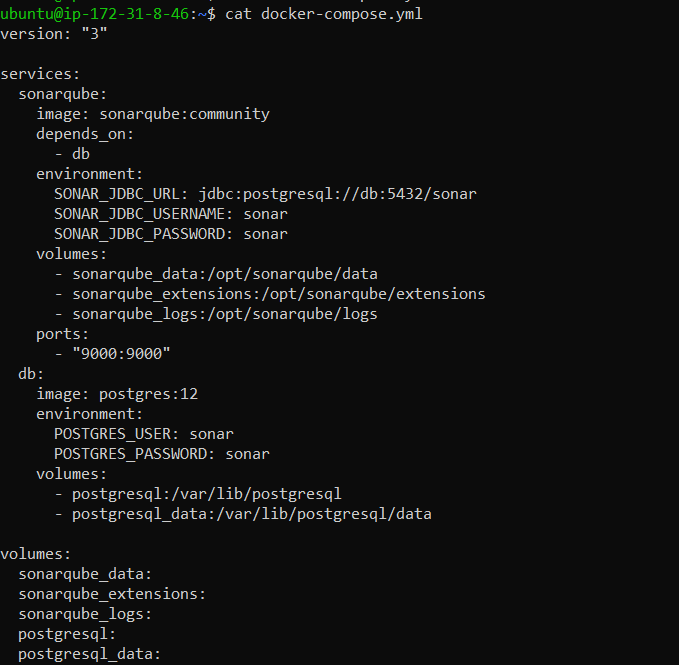
For this, I will create a docker-compose.yml using the below command
nano docker-compose.yml
Paste the above yaml file content in the nano command editor and hit the Control key + “X” then press key “ Y” to save the changes, and verify the contents have been saved properly using the “cat” command.
cat docker-compose.yml
To set up the sonar server along with Postgres just run the below command which will pull in all the specified images for Sonar and Postgres and will start up the containers using which we can access our server.
docker-compose up -d
Post running the above command, verify if images are downloaded and containers are up and running using the below commands.
docker images
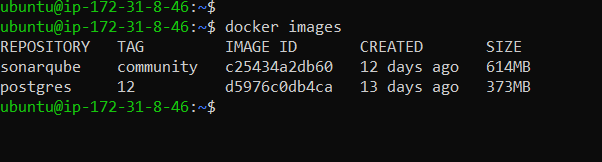
docker ps

Connect to our Sonar server using the instance public-ip address along with the port that we had specified: 9000
In our case, it will be http://13.126.57.51 :9000
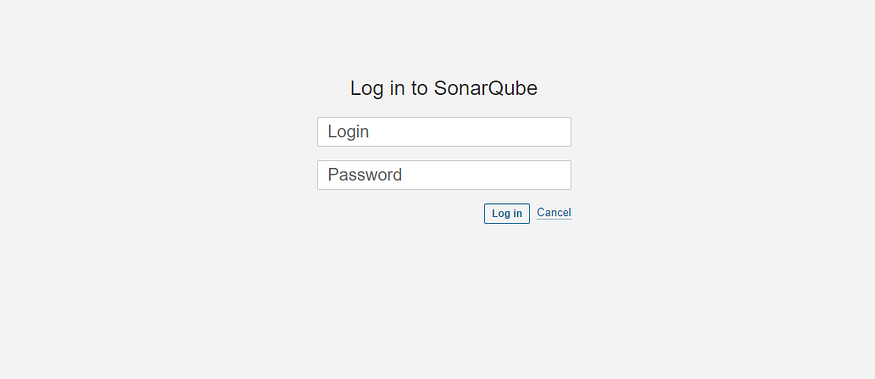
The default username and password will be “admin” for the sonar server, post initial login, it will prompt us to update the default password.
In order to tear down the complete infra, we can run the below command which will remove all the containers and our server will no longer be accessible.
docker-compose down


